Overview
slaveFinder() is a desktop address book application used for people in the HR department of a company to help them filter people and schedule interviews. It also helps with analytics of the hiring process in the company.
Summary of contributions
-
Major enhancement: added Job manipulation functionality
-
What it does: Allows users to interact with new Job object by creating and deleting jobs as well as adding, removing and moving people within the lists contained in job.
-
Justification: This feature allows the user to contain data for more than one job opening as well as to indicate progress of candidates through the job application process.
-
Highlights: Implementation of this class required a modification of the addressbook application across all components. Base addressbook database was enhanced to not only contain a database of people but also a database of jobs. Add command was modified to automatically add people who have applied for an available job to the first list ("applicants") of the job. When a job is created, all applicants for the specific job are automatically added.
-
Credits:
-
-
Minor enhancement: Added a major field and known programming language field which helps in the ranking and filtering of individuals for interviews
-
Code contributed:https://nus-cs2103-ay1819s2.github.io/cs2103-dashboard/#=undefined&search=danieldssim
-
Other contributions:
-
Project management:
-
Managed Issue Tracker by linking pull requests to issues
-
Set-Up milestones 1.1 and 1.2
-
-
Enhancements to existing features:
-
Documentation:
-
Community:
-
Tools:
-
Contributions to the User Guide
Given below are sections I contributed to the User Guide. They showcase my ability to write documentation targeting end-users. |
-
Usage related to Job functions === Job Related Features
Create a Job Hiring Process: createJob
Create a Job hiring process with four person lists: "Applicants", "KIV", "Interview", "Shortlist".
Format : createJob [jn/JOBNAME]
Delete the Job Hiring Process : deleteJob
Delete a Job Hiring Process and all its information
Format : deleteJob [jn/JOBNAME]
Displays one of the four persons list in a job : displayJob
Displays a Job
Format : displayJob [jn/JOBNAME]
Add all shown persons in a list to another list : addAll
Adds all currently shown people in source list to the destination list
Format : addAll TO FROM(Optional) [jn/JOBNAME](Optional)
Examples:
-
list
createJob jn/Lecturer -
addAll applied jn/Lecturer
addAll adds all in database to Lecturer Job -
addAll kiv applied jn/Lecturer
addAll adds all in applied list to kiv list in lecturer
Adds people using by index to a selected list in a Job : movePeople
 Moves a few people specified by index from a specified list to another list in a job.+
Format : `movePeople TO FROM INDEXES [jn/JOBNAME]`
Examples:
-
list
createJob jn/Lecturer -
movePeople applied 1, 2 jn/Lecturer
moves persons with index 1 and 2 to applied list in Lecturer -
displayJob jn/Lecturer -
movePeople kiv applied 2
moves person 2 in applied list to kiv list in Lecturer
Adds people using by index to a selected list in a Job : remove
 Removes people from a specific list in Job+
Format : `remove FROM INDEXES [jn/JOBNAME]`
Select people into "Interview" List: selectInterview Coming in v2.0
Select people from display board to the Job Hiring Process’s "Interviewed" list
Format : selectInterview [INDEX] [INDEX-INDEX] [all]
Examples:
-
selectInterview 2-10
Selects the 2nd person to 10th people to the "Interview" list. -
selectInterview 2 4Selects the 2nd person and 4th people to the "Interview" list. -
selectInterview allSelects all the people on the Person Display List to the "Interview" list.
Select people into "To be sent to boss" List: selectfinal Coming in v2.0
Select people from display board to the Job Hiring Process’s "To be sent to boss" List
Format : selectInterview [INDEX] [INDEX-INDEX] [all]
Generate a final report for the Job Hiring Process : report Coming in v2.0
Generate report.txt to show 3 categories of applicants for a specific role:
"Applied", "Interview", "To be sent to boss". in a Job Hiring Process.
Format : report JOBNAME
Filter Related Features
Filter results : filter
Filter the people displayed on the Person List. Each filer has a name and can be delete, diplay result always base on all filter request.
Format: filter [FILTERLISTNAME] fn/FILTERNAME [n/NAME] pp/PHONE_NUMBER] [nric/NRIC] [e/EMAIL] [a/ADDRESS] [g/GENDER] [r/RACE] [m/MAJOR] [s/SCHOOL] [gr/GRADE] [is1/INTERVIEWSCORESQ1] [is2/INTERVIEWSCORESQ2] [is3/INTERVIEWSCORESQ3] [is4/INTERVIEWSCORESQ4] [is5/INTERVIEWSCORESQ5] [j/JOBS_APPLY]… [kpl/KnowPROGLANG]… [pj/PASTJOB]…
Examples:
-
filter fn/nus s/nus
Shows all persons whose school is NUS in All Applicants List. -
filter fn/nus s/nus m/CS
Shows all persons whose school is NUS and major is CS in All Applicants List. -
filter fn/nus s/nus
filter fn/CS m/CSShows all persons whose school is NUS and major is CS in All Applicants List. -
filter fn/grade gr/4.8-5.0;3.0-3.1
Shows all persons whose grade in range of [4.8,5.0] or [3.0,3.1] in All Applicants List. -
filter Interview fn/nus s/nus
Shows all persons whose school is NUS in Interview List in Job Detail Screen.
Delete a Filter : deleteFilter
Delete a filter showing on the display board and renew the update display people list.
Format: deleteFilter [FILTERLISTNAME] FILTERNAME
Examples:
-
filter fn/nus s/nus
Shows all persons whose school is NUS in All Applicants List. -
deleteFilter nusShows all persons in All Applicants List. -
filter Interview fn/nus s/nus
Shows all persons whose school is NUS in Interview List in Job Detail Screen. -
deleteFilter Interview fn/nus
Shows all persons in Interview List in Job Detail Screen.
Clear a Filter List: clearFilter
Clear a filter showing on the display board and renew the update display people list.
Format: clearFilter [FILTERLISTNAME]
Examples:
-
filter fn/nus s/nus
filter fn/CS m/CSShows all persons whose school is NUS and major is CS in All Applicants List. -
clearFilterShows all persons in All Applicants List. -
filter Interview fn/nus s/nus
filter Interview fn/CS m/CSShows all persons whose school is NUS and major is CS in Interview List in Job Detail Screen. -
clearFilter Interview
Shows all persons in Interview List in Job Detail Screen.
Analytic Related Features
Display Analytics : analytics
Display the analytics of applicants for desired job list (applicant, kiv, interview, shortlist) or all applicants.
Format : analytics LISTNAME or analytics (for all applicants)
Examples:
-
analytics applicant -
analytics kiv -
analytics
Interview Related Features
Generate Interview Dates : generateInterviews
Generate interview dates for all applicants in slaveFinder(). Interview dates cannot be generated again if they are already present. Dates generated exclude weekends and block out dates(see below).
Generate Interview Dates for a particular job : generateInterviews jn/[JOB_NAME] Coming in v2.0
Generate interviews for applicants of a particular job in slaveFinder(). Interview dates cannot be generated again if they are already present. Dates generated exclude weekends and block out dates(see below).
Clear Interview Dates : clearInterviews
Clears the list of generated interview dates.
Clear Interview Dates for a specified job opening : clearInterviews jn/[JOB_NAME] Coming in v2.0
Clears the list of generated interview dates for the specified job.
Set maximum number of interviews a day : setMaxInterviewsADay [NUMBER]
Sets the maximum number of interviews to be generated in a day.
Set block out dates for interviews : setBlockOutDates [DD/MM/YYYY] OR [DD/MM/YYYY - DD/MM/YYYY] OR [DD/MM/YYYY], [DD/MM/YYYY - DD/MM/YYYY]
Sets the block out dates(unavailable dates) which the interviewer is not available for interviews to be scheduled.
Show interviews dates : showInterviews
Shows the list of dates which the interviewees in slaveFinder() are assigned. (Show is not considered an operation in terms of undo/redo, therefore when undo, the previous command before showInterviews is called)
Show interviews dates for a job opening : showInterviews jn/[JOB_NAME] Coming in v2.0
Shows the list of dates which the interviewees for the state job in slaveFinder() are assigned to.
Reschedule Person for interview: move jn/[JOB_NAME] nric/[NRIC] [FROM_DATE(dd/mm/yyyy)] [TO_DATE(dd/mm/yyyy)] Coming in v2.0
Reschedules a person scheduled to a particular date to another date. If to date is not present, the person is removed from that date.
Save interviews data Coming in v2.0
Scheduled interviews is automatically stored in a json file.
Other Basic Command
Viewing help : help
Format: help
Listing entered commands : history
Lists all the commands that you have entered in reverse chronological order.
Format: history
|
Pressing the ↑ and ↓ arrows will display the previous and next input respectively in the command box. |
Undoing previous command : undo
Restores the address book to the state before the previous undoable command was executed.
Format: undo
|
Undoable commands: those commands that modify the address book’s content ( |
Examples:
-
edit 1 n/Johnny
list
undo(reverses theedit 1 n/Johnnycommand)
Redoing the previously undone command : redo
Reverses the most recent undo command.
Format: redo
Examples:
-
edit 1 n/Johnny
undo(reverses theedit 1 n/Johnnycommand)
redo(reapplies theedit 1 n/Johnnycommand) -
edit 1 n/Johnny
redo
Theredocommand fails as there are noundocommands executed previously. -
edit 1 n/Johnny
clear
undo(reverses theclearcommand)
undo(reverses theedit 1 n/Johnnycommand)
redo(reapplies theedit 1 n/Johnnycommand)
redo(reapplies theclearcommand)
Exiting the program : exit
Exits the program.
Format: exit
Saving the data
Address book data are saved in the hard disk automatically after any command that changes the data.
There is no need to save manually.
FAQ
Q: How do I transfer my data to another Computer?
A: Install the app in the other computer and overwrite the empty data file it creates with the file that contains the data of your previous Address Book folder.
Command Summary
-
Add
add n/NAME p/PHONE_NUMBER e/EMAIL a/ADDRESS g/GENDER r/RACE m/MAJOR s/SCHOOL [pj/PAST_JOB]… `
e.g. `add n/James Ho p/22224444 e/jamesho@example.com a/123, Clementi Rd, 1234665 g/Male r/Chinese m/MATH s/NUS pj/Professor t/friend t/colleague -
Clear :
clear -
Delete :
delete INDEX
e.g.delete 3 -
Edit :
edit INDEX [n/NAME] [p/PHONE] [e/EMAIL] [a/ADDRESS]
[g/GENDER] [r/RACE] [s/SCHOOL] [pj/PAST_JOBS] `

e.g. `edit 2 n/James Lee e/jameslee@example.com -
List :
list -
Help :
help -
History :
history -
Undo :
undo -
Redo :
redo -
Generate Interviews :
generateInterviews -
Set maximum number of interviews a day :
setMaxInterviewsADay[MAX_NUM_INTERVIEWS] -
Set block out dates for interviews : `setBlockOutDATES[DD/MM/YYYY OR DD/MM/YYYY - DD/MM/YYYY]
-
Clear interviews dates :
clearInterviews -
Read to slaveFinder() :
readAll -
Get ranked list :
getRankedList -
Filter search results :
filter [FILTERLISTNAME] [fn/FILterName] [n/NAME] [p/PHONE] [e/EMAIL] [a/ADDRESS]
[g/GENDER] [r/RACE] [s/SCHOOL] [pj/PAST_JOBS] `

e.g. `filter fn/Chinese r/Chinese -
Delete Filter search results : `deleteFilter [FILTERLISTNAME] [fn/FILterName] `
e.g. `deleteFilter fn/Chinese ` -
Clear Filter search results : `clearFilter [FILTERLISTNAME] `
e.g. `clearFilter ` -
Display Hiring Process :
displayProcess -
Display Analytics :
analytics LISTNAMEoranalytics -
Create Job :
createJob [jn/JOBNAME] -
Delete Job :
deleteJob [jn/JOBNAME] -
Display Job :
displayJob [jn/JOBNAME] -
Add All :
addAll TO FROM(OPTIONAL) [jn/JOBNAME](OPTIONAL) -
Move People :
movePeople TO FROM(OPTIONAL) INDEXES [jn/JOBNAME](ONLY ON DEFAULT SCREEN) -
Remove : 'remove FROM INDEXES [jn/JOBNAME]'
Contributions to the Developer Guide
Given below are sections I contributed to the Developer Guide. They showcase my ability to write technical documentation and the technical depth of my contributions to the project. |
-
Updated use cases and user stories
-
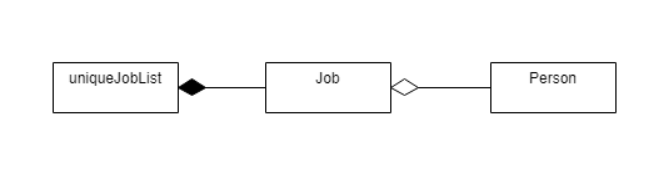
Job Implementation details === Job Feature ==== Current Implementation
The Job feature is facilitated by the Job class and UniqueJobList Class. UniqueJobList contains Jobs by composition while Jobs contains Person by aggregation. The main Database contains one uniqueJobList which holds all the current job openings.
Storage Implementation
Storage of the Job relies on the JsonAdaptedJob and the JsonAdaptedJobPersonList classes to store and load jobs. Instead of storing a Person in the job, due to the relationship of aggregation, the Nric is stored instead. At load time, the UniqueJobList is only created after the UniquePersonList has been created and fills the jobs using the data from UniquePersonList.
Design considerations
How to associate job with the vanilla AB4 structure
-
Alternative 1 (current choice): Store under addressbook class
-
Pros: Can easily adapt methods of add, delete, undo and redo to work with job
-
Cons: Violates Single responsibility principle as addressbook class now manages both Job and Person data
-
-
Alternative 2: Create an overarching class that contains both addressbook which is a database of Person(s) as well as a Job container class.
-
Pros: Reduced coupling
-
Cons: Implementation of an overarching class would require a major overhaul of current system especially Logic and UI components
-
How to store Person in Job in JSON file
-
Alternative 1 (current choice): Store only one unique person identifier and retrieve person
-
Pros: Saves space extremely significantly by avoiding repeat of data due to many jobs having the same person
-
Cons: When loading, requires more time and violates Law of Demeter as Job class now has access to UniquePersonList which is a class contained in Addressbook
-
-
Alternative 2: Store full person data in Job
-
Pros: Faster loading and adheres to Law of Demeter as the Job does not access more that what it is associated with
-
Cons: Greater memory usage
-
Filter Feature
With the filter feature, users can input specific parameters that act as conditions for slaveFinder() to conditionally update the UniqueFilterList and filter the UniquePeronList. Using these parameters, slaveFinder() shows applicants contains the specified parameters. Filter is visble and can combine or be deleted.
Command Format:
filter [FILTERLISTNAME] fn/FILTERNAME [<prefix>/<parameter>]…
deleteFilter [FILTERLISTNAME] fn/FILTERNAME
**clearFilter [FILTERLISTNAME]
-
FILTERLISTNAME indicate which Job list this command will used.
Add Filter
The command format for Adding a Filter is:
Format: filter [FILTERLISTNAME] fn/FILTERNAME [n/NAME] pp/PHONE_NUMBER] [nric/NRIC] [e/EMAIL] [a/ADDRESS] [g/GENDER] [r/RACE] [m/MAJOR] [s/SCHOOL] [gr/GRADE] [is1/INTERVIEWSCORESQ1] [is2/INTERVIEWSCORESQ2] [is3/INTERVIEWSCORESQ3] [is4/INTERVIEWSCORESQ4] [is5/INTERVIEWSCORESQ5] [j/JOBS_APPLY]… [kpl/KnowPROGLANG]… [pj/PASTJOB]…
|
Upon entering the filter command, the filter command word is stripped from the input and the argument fields are passed into the FilterCommandParser class. The FilterListName will be stripped from the argument and parse to LISTNAME object. FilterCommandParser tokenizes the other argument string using ArgumentTokenizer object, The regular expressions will be checked and mapping each parameter to it’s respective prefix in an ArgumentMultiMap object. FilterCommandParser then creates a predicatePersonDescriptor object using the parameter
values in ArgumentMultiMap for each filter. If invalid parameters are specified by the user, or if an invalid FILTERLISTNAME was be inputed, or there is no filter name is provided, then FilterCommandParser throws a ParseException and displays an error message to the user.
If valid inputs are provided, predicatePersonDescriptor will be created and FilterCommandParser will return a FilterCommand with parameters predicatePersonDescriptor and FilterName and FilterListName. FilterCommand then creates a Predicate Manager object (implements Java 8’s Predicate interface) using the parameter values in predicatePersonDescriptor for each filter condition, and combines them into one single Predicate using the and() function in Predicate interface. After that, FilterCommand calls the addPredicate method in Model to set the Predicate List (indicated by FilterListName).In the end FilterCommand calls the updateFilteredPersonList method in Model to update applicants using all current undeleted PredicateManager object. UI will change and displaying all undeleted Filter name label and the Person who evaluates the set Predicate to true. If repeated filterName are specified by the user, or if an non-empty FILTERLISTNAME was be inputed in All Job Screen mode, or if no FILTERLISTNAME was be inputed in JOb Detail Screen mode, then FilterCommandParser throws a CommandException and displays an error message to the user.
Current Implementation
The following sequence diagram shows the flow of events when the filter fn/nus command is entered by the user:
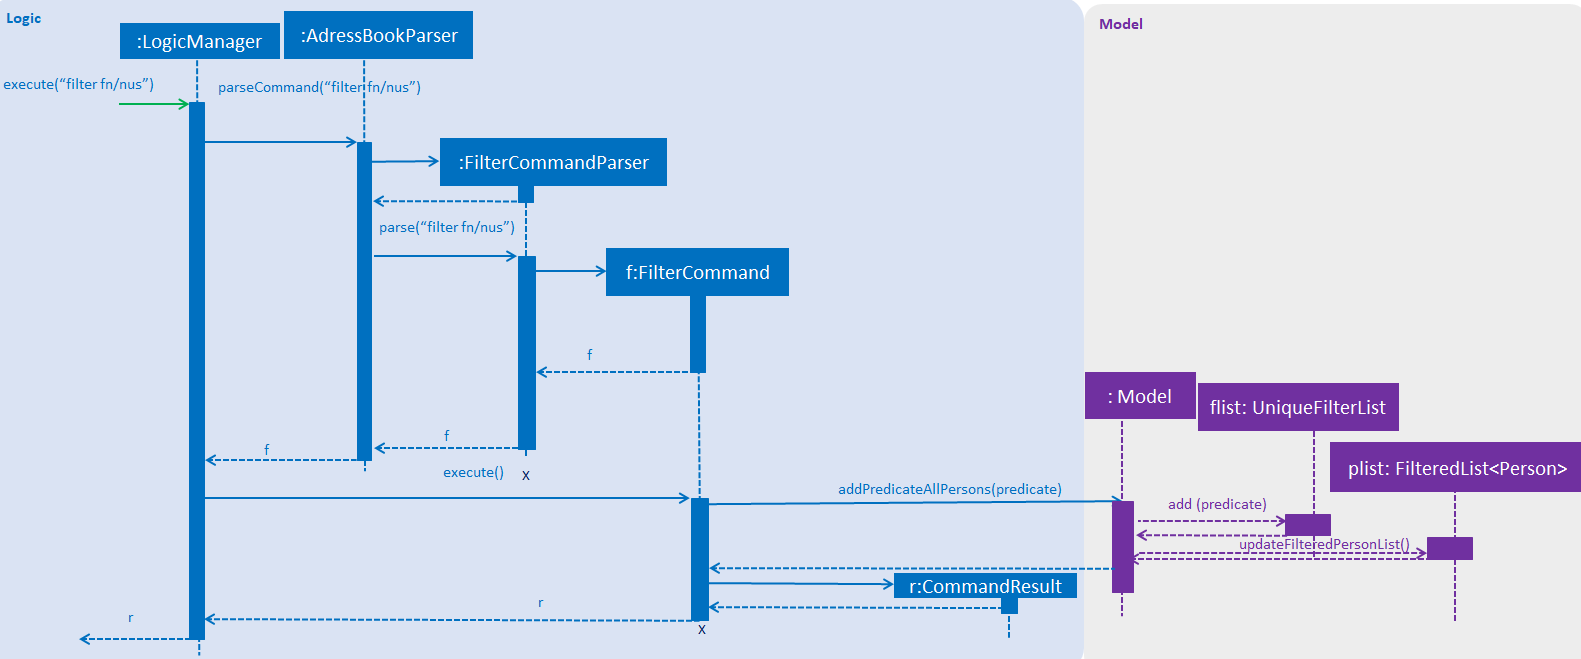
Figure: Sequence diagram illustrating the interactions between the
Logic and Model components when filter command is called.
Delete Filter
The command format for Deleting a filter is:
Format: deleteFilter [FILTERLISTNAME] FILTERNAME
Upon entering the deleteFilter command, the deleteFfilter command word is stripped from the input and the argument fields are passed into the DeleteFilterCommandParser class. The FilterListName will be stripped from the argument and parse to LISTNAME object. DeleteFilterCommandParser tokenizes the FILTERNAME. If an invalid FILTERLISTNAME was be inputed, or there is no filter name is provided, then DeleteFilterCommandParser throws a ParseException and displays an error message to the user.
If valid inputs are provided, DeleteFilterCommandParser will return a DeleteFilterCommand with parameters FilterName and FilterListName. FilterCommand. After that, DeleteFilterCommand calls the removePredicate method in Model to set the Predicate List (indicated by FilterListName).In the end FilterCommand calls the updateFilteredPersonList method in Model to update applicants using all current undeleted PredicateManager object. UI will change and displaying all undeleted Filter name label and the Person who evaluates the set Predicate to true. If no filterName are found, or if an non-empty FILTERLISTNAME was be inputed in All Job Screen mode, or if no FILTERLISTNAME was be inputed in JOb Detail Screen mode, then DeleteFilterCommandParser throws a CommandException and displays an error message to the user.
Clear Filter
The command format for Clearing a filter is:
Format: `clearFilter [FILTERLISTNAME] `
Upon entering the clearFilter command, the clearFfilter command word is stripped from the input and the argument fields are passed into the ClearFilterCommandParser class. The FilterListName will be stripped from the argument and parse to LISTNAME object. ClearFilterCommandParser tokenizes the FILTERNAME. If an invalid FILTERLISTNAME was be inputed, then ClearFilterCommandParser throws a ParseException and displays an error message to the user.
If valid inputs are provided, ClearFilterCommandParser will return a ClearFilterCommand with parameters FilterName and FilterListName. FilterCommand. After that, ClearFilterCommand calls the clearPredicate method in Model to set the Predicate List (indicated by FilterListName).In the end ClearFilterCommand calls the updateFilteredPersonList method in Model to update applicants using an always true PredicateManager object. UI will change and displaying an empty filter panel and the all Persons will show. If an non-empty FILTERLISTNAME was be inputed in All Job Screen mode, or if no FILTERLISTNAME was be inputed in JOb Detail Screen mode, then ClearFilterCommandParser throws a CommandException and displays an error message to the user.
Design Considerations
Aspect: How to parse parameters in filter command
-
Alternative 1 (current choice):
FilterCommandParseCreate apredicatePersonDescriptorobject and parse it toFilterCommand-
Pros:
-
Make filterCommand more comparable. We can compare
predicatePersonDescriptorto say whether two filter Command is same. -
Have better contol on a Filtercommand.
-
-
Cons: Logic is indirect.
-
-
Alternative 2:
FilterCommandParsecombine all conditions (parameters) in a Predicate and parse it toFilterCommand-
Pros: Logic is direct.
-
Cons: Predicate interface is incomparable so this make test more difficult.
-
Aspect: How to design a filter name restricted format
-
Alternative 1 (current choice): Filter name can be any String.
-
Pros:
-
Make Filter name more flexible.
-
A filter may include many information. But user can only see this filter by it’s Filter name label. So it should allow user make a more detailed name for memory and control.
-
-
Cons: Because user can take unpredictable signas their filter name, so it may cause unpredictable bugs.
-
-
Alternative 2: Filter name should only be restricted in the specified format
-
Pros: Easy to control and handle error.
-
Cons: User more need more complicated filter name.
-
Aspect: How to handle filter grade and interview scores
-
Alternative 1 (current choice): Filter parameter become a value range and person’s score in this range will be returned.
-
Pros:
-
Make more sense on filtering value related field.
-
HR manager like to know peron’s score in a range, not exactly in a specified value.
-
-
Cons: May add additional logic and error handling.
-
-
Alternative 2: Same logic as other field
-
Pros: Easy to implement.
-
Cons: HR manager like to know peron’s score in a range, not exactly equal to a specified value.
-
Analytics Feature
Current Implementation
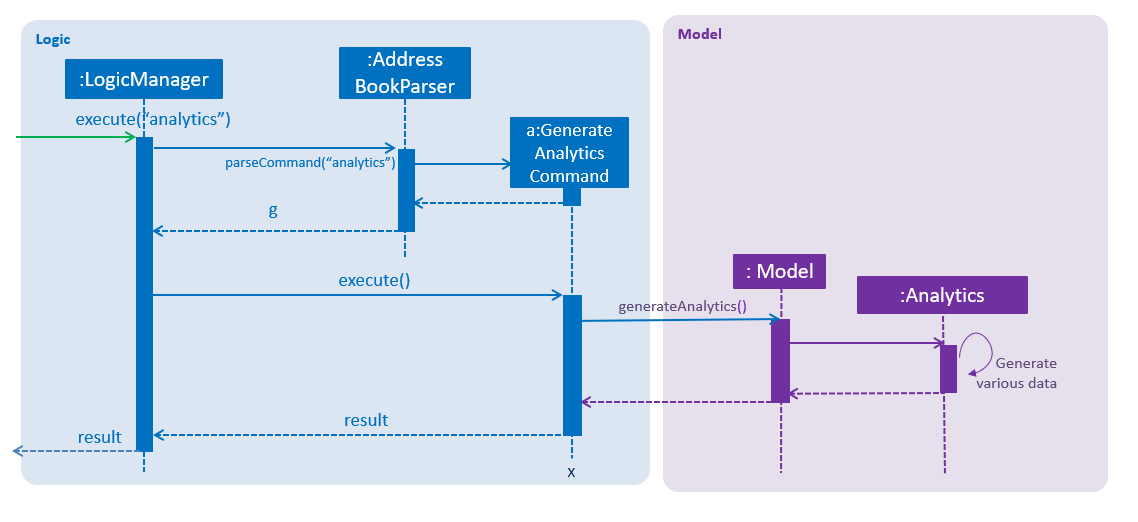
The analytics is facilitated by the Analytics class. Analytics data are generated in real time depending on the specific job currently on display in the software by the user. Hence it will not be saved as states in the versionedAddressBook. It pulls required person list to generate data from Model, which consists of lists: displayedFilter, activeJobAllApplicants, activeJobKiv, activeJobInterview, activeJobShortist. An Analytics object will be created by Analytics class, storing the various required data generated, and pass it to Logic and UI for display.
Given below is the sequence diagram for analytics:
Interviews Feature
Current Implementation
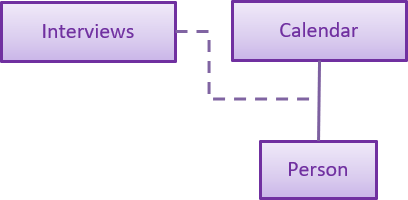
The interviews and its functionalities are facilitated by the Interviews class. It is a private field present in the versionedAddressBook, to facilitate the integration of interviews and its functions with undo/redo operation in slaveFinder(). (Show is not counted as an operation and hence it is not saved as a state). The reason for using Calendar over LocalDate is that in v2.0, the app can be upgrade to schedule interviews for any time instead of only scheduling by days. The Interview class acts as an association class between calendar and person.
For the generate command. There are total 2 parameters that determines how the interviews list is generated. The 2 parameters are: maxInterviewsADay and blockOutDates. maxInterviewsADay determines the number of interviews that can be scheduled a day and it is saved in the interviews class blockOutDates are the user’s own block out dates which represent unavailable dates that the user is not free and therefore interviews cannot be scheduled. Another thing to note is that weekends are not considered in the scheduled as the user is assumed to have normal working hours from Monday to Friday.
Given below is the sequence diagram for generateInterviews:
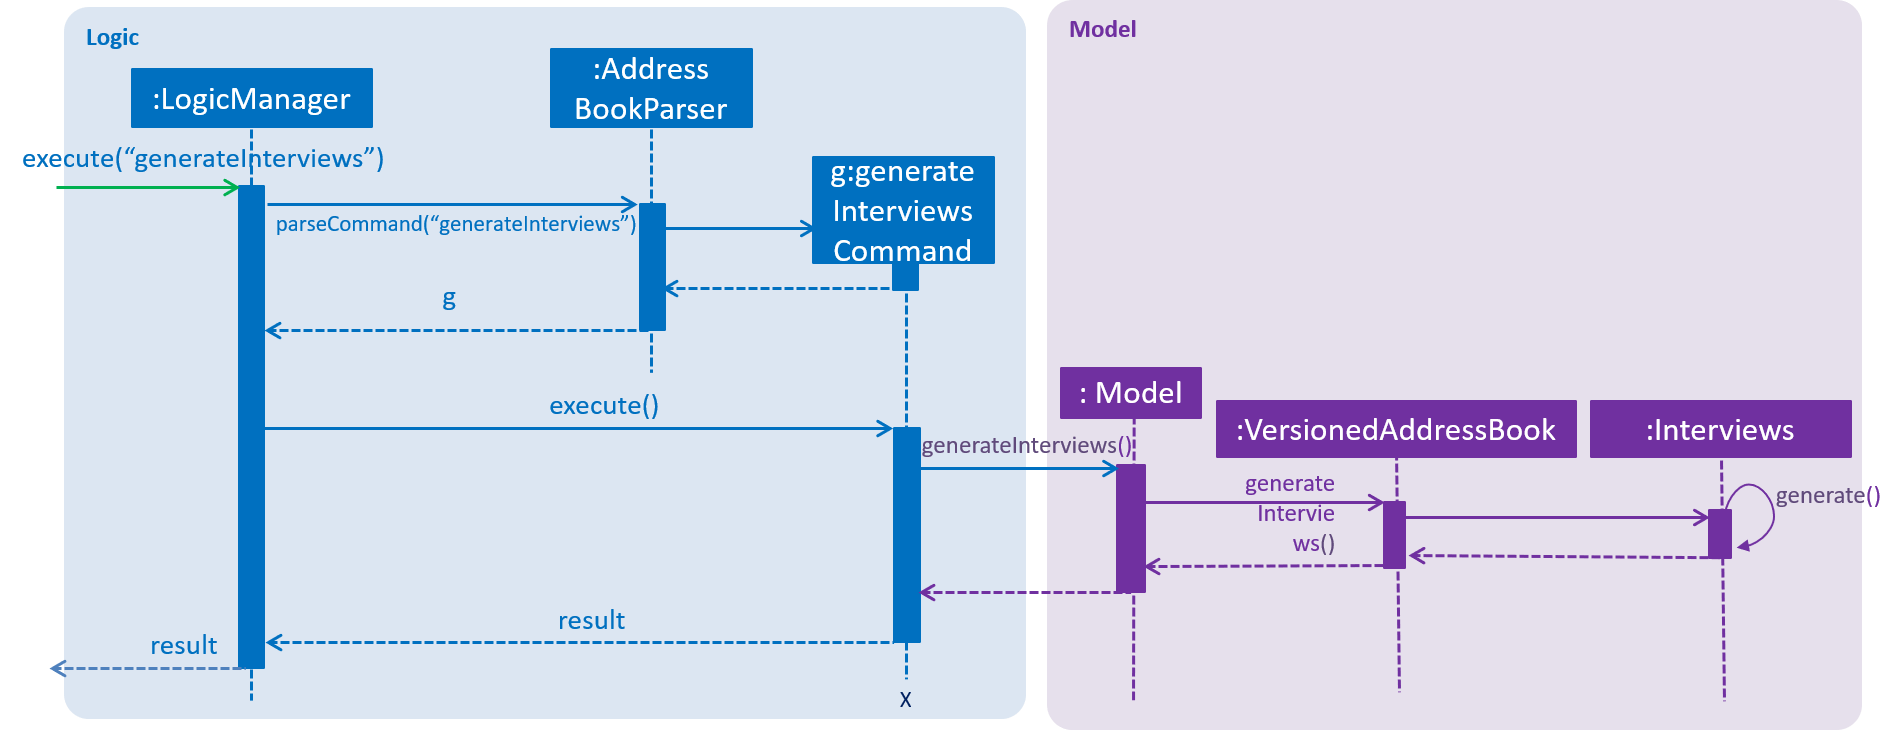
An example of generateInterviews:
Step 1. User launches the application. The blockOutDates field in the interviews class is currently empty.
Step 2. User sets the block out dates with setBlockOutDates command. User does not change the max interviews a day and it is set to a default value of 2.
Step 3. User request for interviews to be generated.
Step 4. Interviews are generated with the restriction based on the parameters and working hours of a normal working adult.
Interviews also works with deletePerson, that is, when a person is deleted, he/she is also removed from his/her scheduled interview slots.
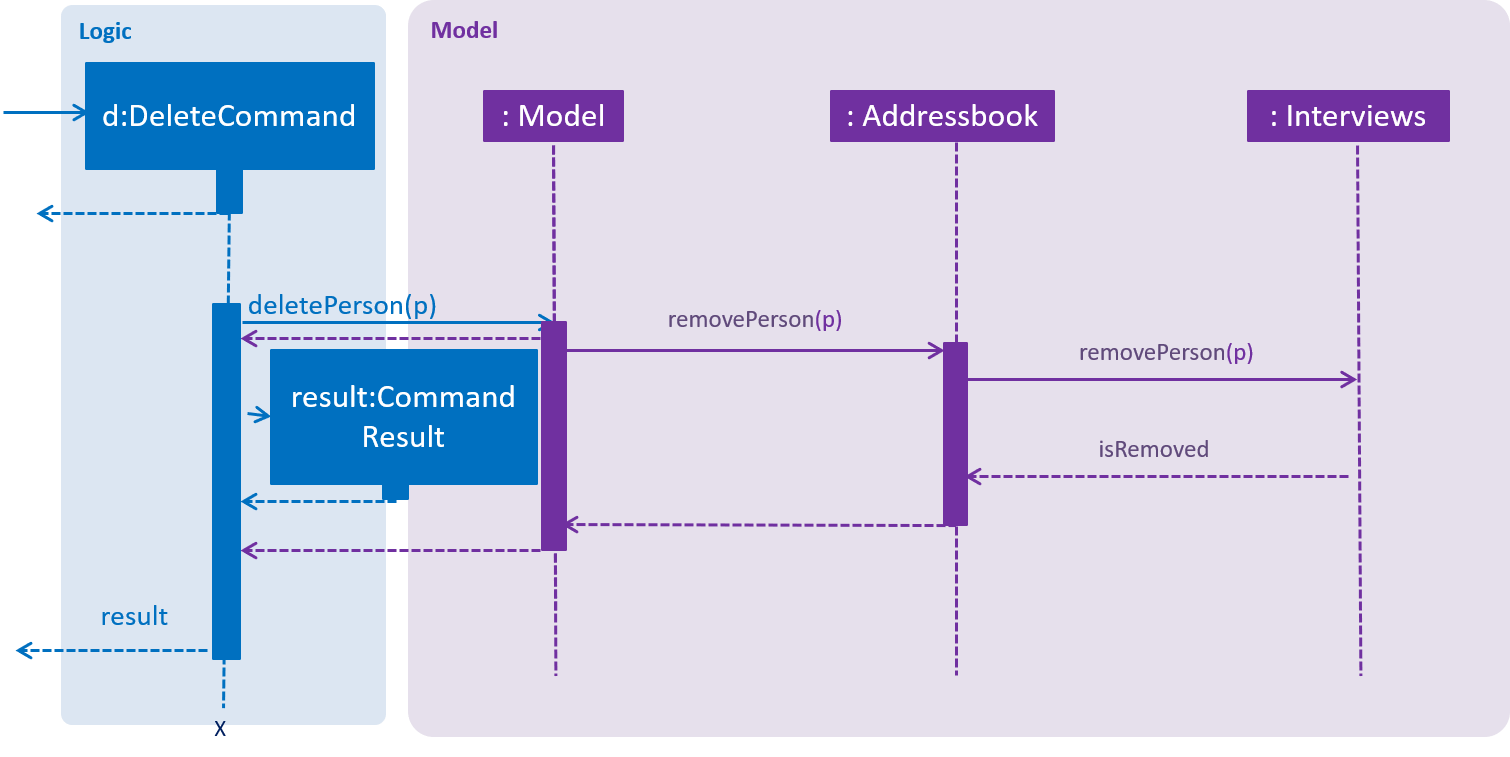
An example of deleting a person:
Step 1. User launches the application and generates interviews.
Step 2. User deletes the person from slaveFinder()
Step 3. Person is removed from his/her scheduled interview date
interviews.removePerson(p) is called. A collection of ArrayList of person is taken from the HashMap and since the collection is backed by the map, any changes to the collection will be reflected in the hashmap. Thus removal of person will be reflected in the hashmap. Therefore this method of removal was used.
Aspect: How interviews is integrated with delete Person command
-
When a person is removed, naturally he/she should also be removed from the scheduled interviews. A remove person function is implemented in interviews which potentially could be used by the v2.0 reschedule command to remove or reschedule persons for interviews.
Aspect: How interviews is integrated with existing undo/redo
-
Alternative 1 (current choice): In order to hinge on the existing undo/redo command, interviews was implemented as a field in AddressBook.java. In the event that undo and redo is called, the data is reset to that of a previous state. In the current implementation, the data is copied over and could take up a lot of time if there is a large amount of dates to copy over.
-
Pros: Easy to implement.
-
Cons: Performance issues may arise in terms of memory usage
-
-
Alternative 2: Implement a function that keeps track of what the user does to interviews and each time a undo is called, the previous command’s inverse function is called.
-
Pros: Less memory is used
-
Cons: Need to consider all possible commands, when adding new command, need to include an inverse command.
-
[Proposed] Data Encryption
{Explain here how the data encryption feature will be implemented}
Logging
We are using java.util.logging package for logging. The LogsCenter class is used to manage the logging levels and logging destinations.
-
The logging level can be controlled using the
logLevelsetting in the configuration file (See Configuration) -
The
Loggerfor a class can be obtained usingLogsCenter.getLogger(Class)which will log messages according to the specified logging level -
Currently log messages are output through:
Consoleand to a.logfile.
Logging Levels
-
SEVERE: Critical problem detected which may possibly cause the termination of the application -
WARNING: Can continue, but with caution -
INFO: Information showing the noteworthy actions by the App -
FINE: Details that is not usually noteworthy but may be useful in debugging e.g. print the actual list instead of just its size
Configuration
Certain properties of the application can be controlled (e.g user prefs file location, logging level) through the configuration file (default: config.json).
Documentation
We use asciidoc for writing documentation.
| We chose asciidoc over Markdown because asciidoc, although a bit more complex than Markdown, provides more flexibility in formatting. |
Editing Documentation
See UsingGradle.adoc to learn how to render .adoc files locally to preview the end result of your edits.
Alternatively, you can download the AsciiDoc plugin for IntelliJ, which allows you to preview the changes you have made to your .adoc files in real-time.
Publishing Documentation
See UsingTravis.adoc to learn how to deploy GitHub Pages using Travis.
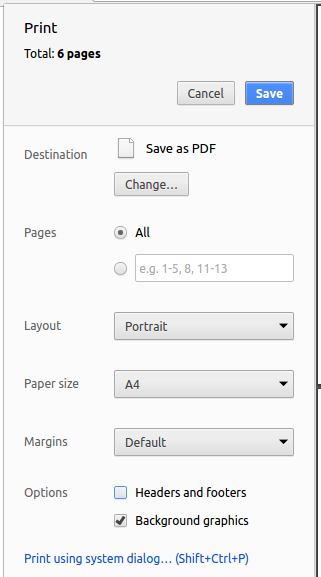
Converting Documentation to PDF format
We use Google Chrome for converting documentation to PDF format, as Chrome’s PDF engine preserves hyperlinks used in webpages.
Here are the steps to convert the project documentation files to PDF format.
-
Follow the instructions in UsingGradle.adoc to convert the AsciiDoc files in the
docs/directory to HTML format. -
Go to your generated HTML files in the
build/docsfolder, right click on them and selectOpen with→Google Chrome. -
Within Chrome, click on the
Printoption in Chrome’s menu. -
Set the destination to
Save as PDF, then clickSaveto save a copy of the file in PDF format. For best results, use the settings indicated in the screenshot below.
Site-wide Documentation Settings
The build.gradle file specifies some project-specific asciidoc attributes which affects how all documentation files within this project are rendered.
Attributes left unset in the build.gradle file will use their default value, if any.
|
| Attribute name | Description | Default value |
|---|---|---|
|
The name of the website. If set, the name will be displayed near the top of the page. |
not set |
|
URL to the site’s repository on GitHub. Setting this will add a "View on GitHub" link in the navigation bar. |
not set |
|
Define this attribute if the project is an official SE-EDU project. This will render the SE-EDU navigation bar at the top of the page, and add some SE-EDU-specific navigation items. |
not set |
Per-file Documentation Settings
Each .adoc file may also specify some file-specific asciidoc attributes which affects how the file is rendered.
Asciidoctor’s built-in attributes may be specified and used as well.
Attributes left unset in .adoc files will use their default value, if any.
|
| Attribute name | Description | Default value |
|---|---|---|
|
Site section that the document belongs to.
This will cause the associated item in the navigation bar to be highlighted.
One of: * Official SE-EDU projects only |
not set |
|
Set this attribute to remove the site navigation bar. |
not set |
Site Template
The files in docs/stylesheets are the CSS stylesheets of the site.
You can modify them to change some properties of the site’s design.
The files in docs/templates controls the rendering of .adoc files into HTML5.
These template files are written in a mixture of Ruby and Slim.
|
Modifying the template files in |
Testing
Running Tests
There are three ways to run tests.
| The most reliable way to run tests is the 3rd one. The first two methods might fail some GUI tests due to platform/resolution-specific idiosyncrasies. |
Method 1: Using IntelliJ JUnit test runner
-
To run all tests, right-click on the
src/test/javafolder and chooseRun 'All Tests' -
To run a subset of tests, you can right-click on a test package, test class, or a test and choose
Run 'ABC'
Method 2: Using Gradle
-
Open a console and run the command
gradlew clean allTests(Mac/Linux:./gradlew clean allTests)
| See UsingGradle.adoc for more info on how to run tests using Gradle. |
Method 3: Using Gradle (headless)
Thanks to the TestFX library we use, our GUI tests can be run in the headless mode. In the headless mode, GUI tests do not show up on the screen. That means the developer can do other things on the Computer while the tests are running.
To run tests in headless mode, open a console and run the command gradlew clean headless allTests (Mac/Linux: ./gradlew clean headless allTests)
Types of tests
We have two types of tests:
-
GUI Tests - These are tests involving the GUI. They include,
-
System Tests that test the entire App by simulating user actions on the GUI. These are in the
systemtestspackage. -
Unit tests that test the individual components. These are in
seedu.address.uipackage.
-
-
Non-GUI Tests - These are tests not involving the GUI. They include,
-
Unit tests targeting the lowest level methods/classes.
e.g.seedu.address.commons.StringUtilTest -
Integration tests that are checking the integration of multiple code units (those code units are assumed to be working).
e.g.seedu.address.storage.StorageManagerTest -
Hybrids of unit and integration tests. These test are checking multiple code units as well as how the are connected together.
e.g.seedu.address.logic.LogicManagerTest
-
Troubleshooting Testing
Problem: HelpWindowTest fails with a NullPointerException.
-
Reason: One of its dependencies,
HelpWindow.htmlinsrc/main/resources/docsis missing. -
Solution: Execute Gradle task
processResources.
Dev Ops
Build Automation
See UsingGradle.adoc to learn how to use Gradle for build automation.
Continuous Integration
We use Travis CI and AppVeyor to perform Continuous Integration on our projects. See UsingTravis.adoc and UsingAppVeyor.adoc for more details.
Coverage Reporting
We use Coveralls to track the code coverage of our projects. See UsingCoveralls.adoc for more details.
Documentation Previews
When a pull request has changes to asciidoc files, you can use Netlify to see a preview of how the HTML version of those asciidoc files will look like when the pull request is merged. See UsingNetlify.adoc for more details.
Making a Release
Here are the steps to create a new release.
-
Update the version number in
MainApp.java. -
Generate a JAR file using Gradle.
-
Tag the repo with the version number. e.g.
v0.1 -
Create a new release using GitHub and upload the JAR file you created.
Managing Dependencies
A project often depends on third-party libraries. For example, Address Book depends on the Jackson library for JSON parsing. Managing these dependencies can be automated using Gradle. For example, Gradle can download the dependencies automatically, which is better than these alternatives:
-
Include those libraries in the repo (this bloats the repo size)
-
Require developers to download those libraries manually (this creates extra work for developers)
Appendix A: Product Scope
Target user profile: HR Executive
-
has a need to manage a significant number of job openings and applicants
-
prefer desktop apps over other types
-
can type fast
-
prefers typing over mouse input
-
is reasonably comfortable using CLI apps
Value proposition: manage contacts faster than a typical mouse/GUI driven app
Appendix B: User Stories
Priorities: High (must have) - * * *, Medium (nice to have) - * *, Low (unlikely to have) - *
| Priority | As a … | I want to … | So that I can… |
|---|---|---|---|
|
new user |
see usage instructions |
refer to instructions when I forget how to use the App |
|
HR |
add a new person |
|
|
HR |
delete a person |
reject applicants not suited for the job |
|
HR |
find a person by personal information |
locate details of persons without having to go through the entire list |
|
HR |
filter persons by some specific requirements |
filter out the persons who are not qualified efficiently. |
|
HR |
create a job posting |
have a place to store and keep track of applicants' progress |
|
HR |
move people to the job posting |
start to manage job applications |
|
HR |
move only selected people to jobs and application progress lists |
more easily manage the progress of applications |
|
HR |
view all applicant progress of job application |
know and keep track of who has applied for the job and their progress |
|
HR |
get the best people for a job |
please my boss |
|
HR |
look at the analytics of the job applicants |
to review the quality of job applicants and ensure a better hiring process |
|
HR |
easily store all txt resumes in slaveFinder() |
be more efficient |
|
HR |
arrange interview dates quickly |
to be more efficient in finding the right person for the job |
|
HR |
include block out dates in before scheduling interviews |
to be more efficient in finding the right person for the job |
|
HR |
delete a job posting |
maintain a cleaner interface |
|
HR |
look at the list of applicants I have narrowed down |
send them to boss for approval |
|
HR |
hide private contact details by default |
minimize chance of someone else seeing them by accident |
|
user with many persons in the address book |
sort persons by name |
locate a person easily |
Appendix C: Use Cases
(For all use cases below, the System is the slaveFinder() and the Actor is the user, unless specified otherwise)
Use case: Delete person
MSS
-
User requests to list persons
-
slaveFinder() shows a list of persons
-
User requests to delete a specific person in the list
-
slaveFinder() deletes the person
Use case ends.
Extensions
-
2a. The list is empty.
Use case ends.
-
3a. The given index is invalid.
-
3a1. AddressBook shows an error message.
Use case resumes at step 2.
-
Use case: Create and view Job opening
MSS
-
User requests to create a new job
-
slaveFinder() creates the new job
-
User requests to add people to the new job
-
slaveFinder() shows updated job data
-
User requests to view job information
-
slaveFinder() changes view to job display panel
Use case ends.
Extensions
-
2a. Job with name already exists
Use case ends.
-
3a. No people in database
-
3a1. User adds people to database
Use case resumes at step 3.
-
Use case: Manage people in job opening
MSS
-
User requests to view job information
-
slaveFinder() changes view to job display panel
-
User selects a few people and requests to move them
-
slaveFinder() moves the people and displays updated information
Use case ends.
Extensions
-
2a. Job does not exist
Use case ends.
-
3a. No people in database
-
3a1. User adds people to job
Use case resumes at step 3.
-
Use case: Generate and show interview dates
MSS
-
User requests to arrange interview dates for applicants in slaveFinder()
-
slaveFinder() assigns to each interviewee a date
-
User request for the interview dates list
Use case ends.
Extensions
-
1a. User wants to set block out dates so no dates are arranged on that day.
-
1a1. Block out dates set using the command.
Use case resumes at step 2.
-
-
1b. User wants to set maximum interviews a day
-
1b1. Max interviews a day set by using the command
Use case resumes at step 2.
-
-
3a. User is not satisfied with the dates
-
3a1. User request to reassign a person to another date
-
3a2. slaveFinder() reassigns that person
-
3a3. slaveFinder() shows the updated interviews dates
Use case ends.
-
Use case: Clear interview dates
MSS
-
User request to clear interviews
-
slaveFinder() clears interviews
Use case ends.
Extensions
-
3a. User wants to recover the cleared interviews through undo
-
3b. slaveFinder() undos the clear interview operation
-
3c. Previous interview dates are recovered.
Use case ends.
Use case: Filter person
MSS
-
User requests to list persons
-
slaveFinder() shows a list of persons
-
User requests to filter persons fulfill some requirements in the list
-
slaveFinder() shows a list of target persons
Use case ends.
Extensions
Extensions
-
2a. The list is empty.
Use case ends.
-
3a. The given command is invalid.
-
3a1. slaveFinder() shows an error message.
Use case resumes at step 2.
-
Use case: View Analytics
MSS
-
User requests to display various lists of applicants from one of the jobs in all job openings lists
-
slaveFinder() shows lists of persons for specific job
-
User requests to view analytics for specific list of persons
-
slaveFinder() shows analytics results
Use case ends.
{More to be added}
Appendix D: Non Functional Requirements
-
Should work on any mainstream OS as long as it has Java
9or higher installed. -
Should be able to hold up to 1000 persons without a noticeable sluggishness in performance for typical usage.
-
A user with above average typing speed for regular English text (i.e. not code, not system admin commands) should be able to accomplish most of the tasks faster using commands than using the mouse.
{More to be added}
Appendix F: Product Survey
Product Name
Author: …
Pros:
-
…
-
…
Cons:
-
…
-
…
Appendix G: Instructions for Manual Testing
Given below are instructions to test the app manually.
| These instructions only provide a starting point for testers to work on; testers are expected to do more exploratory testing. |
For interviews test commands:
-
setMaxInterviewsADay 3
-
setBlockOutDates 22/04/2019 - 24/04/2019
-
generateInterviews
-
showInterviews
-
delete 1 (check that interviews works with delete)
-
showInterviews
-
clearInterviews
-
showInterviews
-
undo (check that interviews works with undo)
-
redo (check that interviews works with redo)
Launch and Shutdown
-
Initial launch
-
Download the jar file and copy into an empty folder
-
Double-click the jar file
Expected: Shows the GUI with a set of sample contacts. The window size may not be optimum.
-
-
Saving window preferences
-
Resize the window to an optimum size. Move the window to a different location. Close the window.
-
Re-launch the app by double-clicking the jar file.
Expected: The most recent window size and location is retained.
-
{ more test cases … }
Deleting a person
-
Deleting a person while all persons are listed
-
Prerequisites: List all persons using the
listcommand. Multiple persons in the list. -
Test case:
delete 1
Expected: First contact is deleted from the list. Details of the deleted contact shown in the status message. Timestamp in the status bar is updated. -
Test case:
delete 0
Expected: No person is deleted. Error details shown in the status message. Status bar remains the same. -
Other incorrect delete commands to try:
delete,delete x(where x is larger than the list size) {give more}
Expected: Similar to previous.
-
Filtering a list of persons
-
Filtering a list of person while All Job Screen show
-
Prerequisites: Using
listcommand to get to All Job Screen. -
Test case:
filter fn/CS m/CS
Expected: All persons with major CS in All Applicants list will show, a filter named "CS" will show on Filter list panel. -
Test case:
filter none
Expected: List unchangeed. Error details shown in the status message. Status bar remains the same. -
Other incorrect filter commands to try:
filter a,filter a fn/CS,filter b fn/CSExpected: Similar to previous.
-
-
Filtering a list of person while Job Detail Screen show
-
Prerequisites: Create a job object using the
createJobcommand. Display job list using theDisplayJobcommand. 4 lists of persons
will show. -
Test case:
filter a fn/CS m/CS
Expected: All persons with major CS in "Applicant" list will show on the Applicant list, a filter named "CS" will show on Filter list panel. -
Test case:
filter none
Expected: List unchangeed. Error details shown in the status message. Status bar remains the same. -
Other incorrect filter commands to try:
filter a,filter fn/CS,filter b fn/CSExpected: Similar to previous.
-
Saving data
-
Dealing with missing/corrupted data files
-
{explain how to simulate a missing/corrupted file and the expected behavior}
-
{ more test cases … }